Tag Archives: diy

Fairy Wings on the Fly

24 Aug

wings 3Suuki was in a full panic wanting to have a costume for the New York Renaissance Faire. Unfortunately the Dollar Tree was out of their usual fairy wings so I had to come up with Plan B. Plan B was making my own set of wings. All the items you need can be purchased at the Dollar Tree.

You will need:
2 Plastic clothes hangers
1 Pair of Trouser Socks
1 Package of Gem Flowers
1 Package of Tulle Butterflies.
1 Roll of Tulle any color
1 Roll of Colored Duct Tape

  1. Take 1 trouser sock and carefully slide it over the triangle part of the clothes hanger. Repeat for the second sock.Wings 1
  2. Place the two hanger handle to handle so they make a wing shape and using the colored duct tape, secure the handles together by wrapping the colored tape around the handles.
  3. Glue the gem flowers and tulle butterflies all over the wings using a hot glue gun.
  4. Wrap the duct tape in the colored tulle to give it a whimsical look.
  5. Use the tulle to make shoulder straps.  I cut 3 foot strips of tulle for this.  Throughout the wear during the day we learned to tie it 3 different ways:  around each arm tied in the front, coming under the arms and tying behind the neck, and going over the shoulder, under the arms and tying in the back.Wings 2
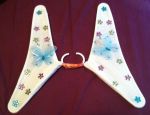
  6. Optional Step:  I used ribbon I had leftover from a previous project to decorate the wings more.

I used the left over tulle to decorate their ponytails into a banded style.

The TARDIS Trunk

13 Apr

Tardis Trunk
Trunk Before 1
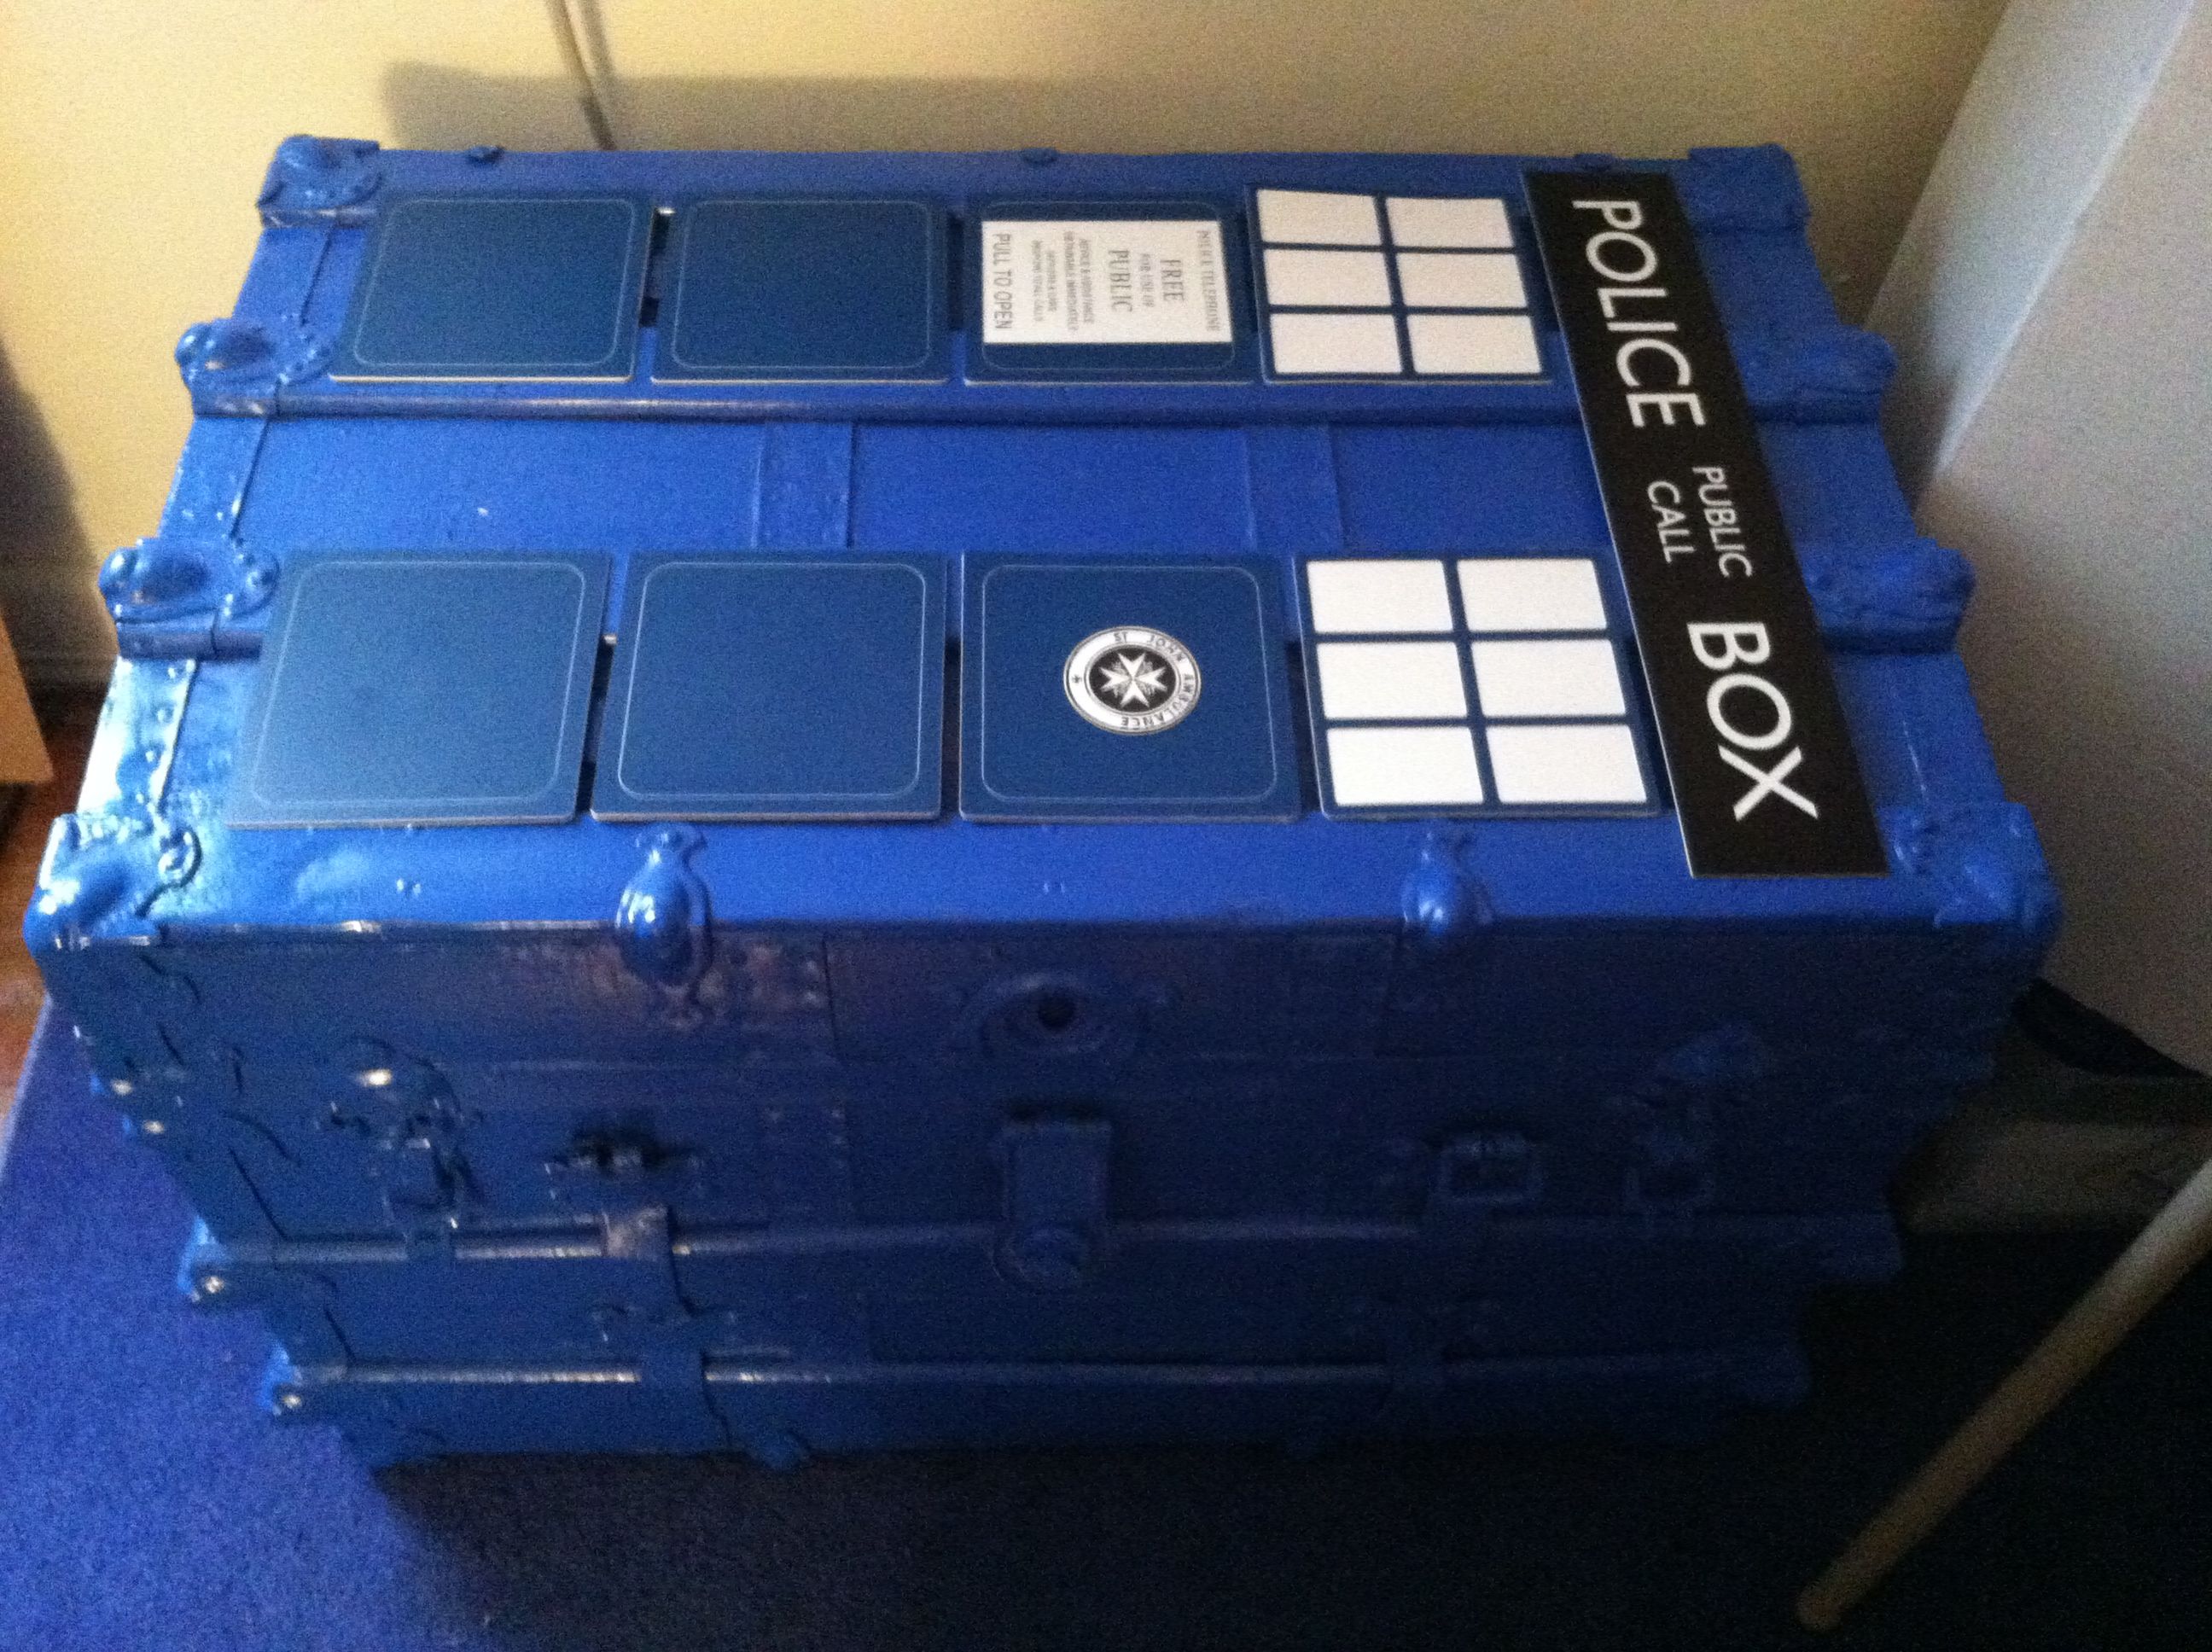
It all started so innocently.  I have always wanted an old-fashioned trunk.   Towards the end of the summer, I passed a garage sale on my way home from work and came across a very beaten up trunk.   They were actually selling the stuffed animals inside of it and you got the trunk for free.  For $5, I bought my trunk and donated the stuffed animals to charity.  The new trunk had seen better days.   Someone had painted the outside bright green and then used green and pink shelf paper to line the inside.Trunk Before 2

I got to work scraping and cleaning the trunk as best I could.  I peeled away all of the shelf paper.  Using sandpaper, a paint scraper, and buffer, I cleaned, peeled, smoothed and scraped away the inside until it was clean enough to look slightly presentable.  While cleaning a plan had formulated.  I was going to turn this trunk into a TARDIS.
Trunk Before 3 Trunk Before 4

To start changing this trunk into the TARDIS I needed some materials from both a hardware store and the craft store.

The Trunk Base

Supplies:

  • Several cans of Blue spray paint
  • 1 large plastic tarp
  • Several rolls of Blue duct tape
  1. In a well ventilated area, place your plastic tarp on the ground and slide the trunk on top.
  2. Spray the entire outside of the trunk Blue.  (This may take several coats and turns.)
  3. Cover the entire inside of the trunk with the Blue Duct Tape. (I did try painting it at first but it didn’t work so well on this texture.  I also tried contact paper which would not stick to the wood.)

Now that we have a base, the hard part starts.  I was going to paint each bit but then I got a better idea.

At work,  I used Rowmark LaserMark Blue/White to laser cut out the door panels.  The windows and door signs are designed by me and laser cut from Rowmark Flexicolor White/Black with 3M backing.  The Police Box sign was also designed by me and laser cut from Rowmark Flexicolor Black/White with 3M backing.   Once I put it all together, it looked FANTASTIC.

Tardis Trunk Top

Tardis Trunk Inside

I tried to think about what inspirred the idea of making the trunk into the TARDIS and I think it was a Neatorama article about a TARDIS Bookshelf.  I remember thinking how cool it would be to turn my own furniture into Doctor Who-themed items.


Happy 50th Birthday, Doctor Who!

23 Nov

50TH CAKEy50th picChalk Big

In honor of the big day, I am reposting how to make Dalek cake toppers.  Who doesn’t want an edible Dalek?

IMG_0258 IMG_0256 IMG_0257

Dalek Cake Topper

Ingredients:

  • 6 flat bottomed ice-cream cones
  • 1 Wilton White Rolled Fondant 1.5lb
  • 1 Black Wilton Icing Color 1oz
  • 1 Brown Wilton Icing Color 1oz
  • 1 Golden Yellow Wilton Icing Color 1oz
  • 1 Black Pearlized Sugar Pearl Sprinkles 5oz
  • 10 pieces of black taffy (sold by the piece – 15 for $1 at Party City)
  • 4 pieces of white taffy (sold by the piece – 15 for $1 at Party City)
  • 1 pieces of blue taffy (sold by the piece – 15 for $1 at Party City)
  • 1 small package of thin pretzel sticks
  • 1 small package of powdered sugar (This is used to keep the fondant from sticking to table, rolling pin and pretty much anything.)

Directions:

It is a good idea to wear gloves on your hands for steps 2 – 9 to prevent turning your hands blackish brown.

  1. Stack 2 flat bottomed ice-cream cones into each other and turn upside down on a plate.
  2. Separate the fondant into 1 lb and 1/2 lb balls.
  3. Add black icing color to 1/2 lb ball of fondant and knead to desired grey color. (Note: You need powdered sugar to keep fondant from sticking.)
  4. Add brown icing color and just a touch of golden yellow icing color to the 1 lb ball of fondant and knead to desired golden color. (Note: You need powdered sugar to keep fondant from sticking.)
  5. Make 3 balls of golden fondant the diameter of a quarter and place to the side.
  6. Separate golden fondant into 3 even balls and then roll out the golden fondant with a rolling pin. (Note: You need powdered sugar to keep fondant from sticking.)
  7. Place the golden fondant ball in top of the bottom of each ice cream cone and then carefully cover the whole thing with the golden fondant. you can tuck extra fondant under and into the cone to secure it. (Note: Have a small cup of water handy to use to seal the ends by rubbing it with water.)
  8. Roll out the grey fondant ball with a rolling pin. (Note: You need powdered sugar to keep fondant from sticking.)
  9. Cut 3 – 1/2 inch strips of grey fondant. Wet the golden fondant on fattest part of the cone and wrap the grey fondant strip around it to form the Dalek base.
  10. Pour the black pearl sprinkles into a bowl. (Good time to remove gloves.)
  11. Do these next steps one cone at a time: Using your fingers, moisten the bottom of your Dalek just above the grey base to the dent where the cone tapers in.
  12. Carefully place the pearls onto the cone in 4 rows creating columns of “Dalek bumps” on your Dalek.
  13. Unwrap 2 pieces of white taffy and knead them until they are soft.
  14. Roll the taffy and cut into 6 pieces. Roll each piece into a ball and then form the lights on the top of the Dalek’s head. Moisten the area you wish to place the lights and the bottom of the lights. Press into place.
  15. Do the stripes one at a time. For each, unwrap 2 piece of black taffy and knead until soft.
  16. Roll the taffy into a thin string and cut it into 3rds. Wrap each piece around the base of your Dalek’s head.
  17. Unwrap a black piece and a white piece of taffy. You will need to pull them together over and over to create a grey piece of taffy.
  18. Break 3 pretzel sticks in half. Wrap one end of each with the grey taffy and shape into a eggbeater. Stick the other end, downward into the left side of the Dalek above the “Dalek bumps”. (The Dalek’s left but your right.)
  19. Unwrap the remaining black taffy and knead until soft. Mold the taffy to make 6 suction cups, 3 slight larger than the other 3.
  20. Stick a pretzel stick into the back of each suction cup and mold the taffy onto the pretzel.
  21. The larger suction cups are inserted on the opposite side from the grey beater shaped pretzels. These make up the Dalek arms.
  22. Unwrap and knead the blue piece of taffy. Form 3 small balls and place them instead the 3 remaining suction cups to be lights.
  23. Unwrap the knead the last piece of white taffy. Roll very thin, almost string like, and wrap around the middle of each suction cup pretzel remaining.
  24. Insert the last suction cup pretzels into the Dalek’s head, dead center.

stackedconesfondantcoveredconedalekbaseDalekbumpsheadlightdalekstripesDalektrio


Here is to 50 more years!!!!

Chalk Sky

The Weeping Angel Halloween Decoration

24 Oct

WeepingAngel1Who has the scariest door in the entire town?   We do and it only cost $1 to make.

You will need:WeepingAngel2

  • 1 Black Foam Sign ($1 at the Dollar Tree)
  • 1 Silver SharpieWeepingAngel3
  1. Write the words “Don’t Blink!” on the back of your Foam Sign with the Silver Sharpie.  Write the letters in a scary looking font.
  2. You can download and save this one or you can do a Google search for Weeping Angel Face.WeepingAngelMask
  3. Select your the scariest.  Print out either mine or the one you selected.
  4. Color the eyes in with the Silver Sharpie for a creepier effect.  Cut out your Weeping Angel Face.
  5. Hang both on your door to scare the neighbors.

Bonus:  You can also print mine or the one you selected out.  Glue it to cardboard.  Cut the shape and the eyes out.  Now you have a Weeping Angel Mask.  Eek!

“Don’t blink. Don’t even blink. Blink and you’re dead. Don’t turn your back. Don’t look away. And don’t blink.”
-The 10th Doctor, Blink(3:10)

WeepingAngel4

Related Weeping Angel scariness:
1. Weeping Angel Cookies (Discovered at:  Topless Robot)
2.  Weeping Angel Mask (Discovered at:  The Mary Sue via Fasionably Geek)
3.  Weeping Angel Family Car Stickers
4. Don’t Blink Flip Up Tradtional T-Shirt or Don’t Blink Flip UpWomen’s Tee

Wedding Gift Wreath – Kitchen Utensils.

28 Jun

Wedding Wreath of Kitchen Utensils

My co-worker got married this past Saturday so we had a mini wedding party for her at work.  I knew that the others were buying her new pots and pans so I decided to make her a special wedding wreath with kitchen utensils.  All the items used to make the wreath were purchased at the Dollar Tree.  It came out a lot better than I anticipated.   My co-worker told me I made it too nice because her new hubby did not want to take the untensils off and ruin it.

You will need:

  • 1 Pool Noodle
  • 1 Roll of White Masking Tape
  • 3 Rolls of White Tulle
  • 2 Bunches of White Fake Flowers
  • An assortment of Kitchen Utensils (I used:  spatula, set of silicon spatulas, slotted spoon, regular spoon, potato masher, ladle, strainer ladle, wooden spoon set, measuring cups w spoon set, spoon rest, cheese grater, vegetable peeler, small mesh colander set.)
  1. As seen in the Tornado Costume tutorial, roll a cardboard tube into a thin roll so that they can fit inside the hole of the pool noodle. Place one inside the pool noodle and connect both ends to the cardboard roll to create a ring. Secure the joined with masking tape.
  2. So the color of the pool noodle does not take away from the beauty of the wreath, wrap the entire pool noodle wreath with masking tape.
  3. Take one of the rolls of tulle and wrap it around the noodle. You will need to tie it off at both the beginning and the end.
  4. Cut the other 2 rolls of tulle into 8-10 inch strips.  They do not have to be exact.  I eyeballed it.
  5. Using the tulle strips, begin tying the kitchen utensils in a creative pattern so that the utensil sits inside the wreath.
  6. Once all the utensils are tied to the wreath, tie the utensils to each other with tulle strips so that when you pick the wreath up, the utensils stay in place.  (I would tie 3 together at different angles.)
  7. Separate the flowers so that they each have their own stem.  Slide the stem through the tulle ties on the wreath to arrange the flowers on the wreath.
  8. Using the tulle strips to tie the flowers in place on the wreath.
  9. Use the remaining tulle strips to decorate the noodle part of the wreath and give it more thickness.

Tea Bag Wreath – Mother’s Day

17 May

TeaWrathonTableMy mother is an avid tea drinker.   She drinks at least 3 cups of tea a day so for Mother’s Day I made her a Tea Bag Wreath.

You will need:

  • A large cardboard box.
  • Flowered Paper – tissue, scrapbook, crafting, etc.
  • 1 large glue stick
  • A package of hinged, wooden clothespins
  • 4 boxes of tea that come in packets (Packet Tea Brands include:  Celestial Seasonings, Bigelow, Twinings, Stash, Taz, Traditional Medicinals, etc)
  • Optional:  Picture of children, stickers.

1.  Using a large pot, trace two circles onto the cardboard box.  Using a bowl, trace a circle in the middle of one of the circles you just traced.

2.  Using a box cutter or exacto knife, cut out the smaller circle first followed by the two larger circles.   This will give you one wreath, a large circle and a small circle.

3.  Cover all the large circle and the wreath with flowered paper using the glue stick.  The wreath can be tricky so you need to glue it down, cut strips on the middle and outside, then glue to the back of the wreath.

4.  If you are adding pictures, you will need the small circle.  If you are not, skip this step.  Using the small circle as a guide, cut out a picture of children or a piece of colored paper the size of the small circle.  Decorate with stickers or write a message on the circle.   Using the wreath as a guide, glue the paper to the middle of the large circle it will show through when the wreath is in place.

5.  Place the wreath over the large circle until you find the alignment you like.

6.  Trace the clothespin onto the back of flowered paper repeatedly until you have traced enough for each clothespin.  (I used different paper from the wreath.)  Cut out the small strips of flowered paper and then glue them to one side of the clothespins.  I used a full package of clothes pins but the number will depend on the size of your wreath, the size of the clothespins, and how many tea bags you wish to hold in place.

6.  Organize your teabags into the pattern you want around the wreath.   Using the clothespins, carefully clip your teabags to the wreath.  Put clothespins on both the outer and inner parts of the wreath.

7.  To hang your wreath, take a strip of ribbon and slide it through the top of the wreath between the large circle and wreath layer.  Tie off the ribbon as a loop.   With the clothespins in place, the wreath can hang without the ribbon being glued down.

8.  Hang in place.  (I hung my mother’s from the wreath hanger she still had on her door from Christmas.)

TeaWrathonPan TeaWrathonBowl

TeaWrathonGlueLayout TeaWrathonGlueWreath

TeaWrathonMiddleCut TeaWrathonTableseparate

TeaWrathonTablenotea TeaWrathLayoutTeaBags

TeaWreathClothespinsPrep TeaWreathClothespins

TeaWrathonTable

Dalek Cake Topper

22 Apr

My son’s 10th birthday is tomorrow and last night he springs on me that he wants a Dalek birthday cake.  So I do a search all over the internet for different types of Dalek cakes, cupcakes, etc to see what I like and nothing really looked the way I wanted.  I had already gotten him his triple chocolate cake mix with the triple chocolate frosting so I came up with the idea to make an edible cake topper instead.  For his class, we ordered a cookie cake so I made sure to have an extra Dalek to put on top of that as well.  This is the first time I have ever tried using fondant so I don’t think I did too badly for a first try.

IMG_0258 IMG_0256 IMG_0257

Dalek Cake Topper

Ingredients:

  • 6 flat bottomed ice-cream cones
  • 1 Wilton White Rolled Fondant 1.5lb
  • 1 Black Wilton Icing Color 1oz
  • 1 Brown Wilton Icing Color 1oz
  • 1 Golden Yellow Wilton Icing Color 1oz
  • 1 Black Pearlized Sugar Pearl Sprinkles 5oz
  • 10 pieces of black taffy (sold by the piece – 15 for $1 at Party City)
  • 4 pieces of white taffy (sold by the piece – 15 for $1 at Party City)
  • 1 pieces of blue taffy (sold by the piece – 15 for $1 at Party City)
  • 1 small package of thin pretzel sticks
  • 1 small package of powdered sugar (This is used to keep the fondant from sticking to table, rolling pin and pretty much anything.)

Directions:

It is a good idea to wear gloves on your hands for steps 2 – 9 to prevent turning your hands blackish brown.

  1. Stack 2 flat bottomed ice-cream cones into each other and turn upside down on a plate.
  2. Separate the fondant into 1 lb and 1/2 lb balls.
  3. Add black icing color to 1/2 lb ball of fondant and knead to desired grey color.  (Note:  You need powdered sugar to keep fondant from sticking.)
  4. Add brown icing color and just a touch of golden yellow icing color to the 1 lb ball of fondant and knead to desired golden color.    (Note:  You need powdered sugar to keep fondant from sticking.)
  5. Make 3 balls of golden fondant the diameter of a quarter and place to the side.
  6. Separate golden fondant into 3 even balls and then roll out the golden fondant with a rolling pin.  (Note:  You need powdered sugar to keep fondant from sticking.)
  7. Place the golden fondant ball in top of the bottom of each ice cream cone and then carefully cover the whole thing with the golden fondant.  you can tuck extra fondant under and into the cone to secure it.  (Note:  Have a small cup of water handy to use to seal the ends by rubbing it with water.)
  8. Roll out the grey fondant ball with a rolling pin.  (Note:  You need powdered sugar to keep fondant from sticking.)
  9. Cut 3 – 1/2 inch strips of grey fondant.  Wet the golden fondant on fattest part of the cone and wrap the grey fondant strip around it to form the Dalek base.
  10. Pour the black pearl sprinkles into a bowl.  (Good time to remove gloves.)
  11. Do these next steps one cone at a time:  Using your fingers, moisten the bottom of your Dalek just above the grey base to the dent where the cone tapers in.
  12. Carefully place the pearls onto the cone in 4 rows creating columns of “Dalek bumps” on your Dalek.
  13. Unwrap 2 pieces of white taffy and knead them until they are soft.
  14. Roll the taffy and cut into 6 pieces.  Roll each piece into a ball and then form the lights on the top of the Dalek’s head.  Moisten the area you wish to place the lights and the bottom of the lights.  Press into place.
  15. Do the stripes one at a time.  For each, unwrap 2 piece of black taffy and knead until soft.
  16. Roll the taffy into a thin string and cut it into 3rds.  Wrap each piece around the base of your Dalek’s head.
  17. Unwrap a black piece and a white piece of taffy.  You will need to pull them together over and over to create a grey piece of taffy.
  18. Break 3 pretzel sticks in half.  Wrap one end of each with the grey taffy and shape into a eggbeater.  Stick the other end, downward into the left side of the Dalek above the “Dalek bumps”.  (The Dalek’s left but your right.)
  19. Unwrap the remaining black taffy and knead until soft.  Mold the taffy to make 6 suction cups, 3 slight larger than the other 3.
  20. Stick a pretzel stick into the back of each suction cup and mold the taffy onto the pretzel.
  21. The larger suction cups are inserted on the opposite side from the grey beater shaped pretzels.  These make up the Dalek arms.
  22. Unwrap and knead the blue piece of taffy.  Form 3 small balls and place them instead the 3 remaining suction cups to be lights.
  23. Unwrap the knead the last piece of white taffy.  Roll very thin, almost string like, and wrap around the middle of each suction cup pretzel remaining.
  24. Insert the last suction cup pretzels into the Dalek’s head, dead center.

stackedconesfondantcoveredconedalekbaseDalekbumpsheadlightdalekstripesDalektrio

Tristan Cake 1Tristan Cake 2

Homemade Girl’s Kapa Haka

18 Apr

I have completed all the pieces for Suuki’s a Kapa Haka costume for the multicultural event.  You can find the tutorials at the lines below:

Under the skirt they wore a pair of black leggings that we cut into shorts.  Our event was tonight and they had a blast in their costume.

Full Kapa Haka Costume

Full Kapa Haka Costume

Here are some other pictures from the event, including one of her and her friend from the Mexico table.

IMG_4066

IMG_4070IMG_4071IMG_4069

IMG_4063

Homemade Girl’s Tipare Headband

17 Apr

Part w of my Kapa Haka costume is the Pari Bodice.  This goes with Homemade Girl’s Piupiu Skirt and Homemade Girl’s Pari Bodice.

You will need:

  1. Cut a 11.5 x 2.5 inch rectangle from the sleeve fabric.
  2. Plan out the geometric pattern you plan to have on your headband and cut out pieces of the felt accordingly.
  3. Using the hot glue gun, glue your pattern to the front of your black rectangle.
  4. Glue the piece of ribbon to the back of the headband.

IMG_4073

Homemade Girl’s Pari Bodice

15 Apr

Part 2 of my Kapa Haka costume is the Pari Bodice.  This goes with Homemade Girl’s Piupiu Skirt.

You will need:

  • 1 black t-shirt($3.99 on sale at the Michael’s)
  • 2 – 9 in x 12 in stick-it felt sheets in red  & white( $1.29 per sheet at Michael’s)
  • Hot Glue Gun w/ extra glue sticks($1 for a mini-gun & $1 for a pack of glue sticks at the Dollar Tree)
  1. Turn -t-shirt inside out and then fold the t-shirt in half so that the arms are lined up perfectly.  Lay on a flat surface.IMG_4072
  2. Starting under the on arm, mark an “L” shape from under the arm up the shoulder and then mark another “L” shape on the collar side so that the “L” markings line up.   There should be about 2 inches between the 2.  (I used a silver sharpie to mark it but you can also use chalk.)
  3. Using sharp scissors, cut the arms and collar off of the t-shirt using the “L” shapes.  By having the shirt folded in half, you can cut both sides at once so they are symmetrical.  (Save the pieces you cut off for use later and for your Tipare.)
  4. Using the hot glue gun, fold over a small seam on the areas you cut to give the bodice a clean edge and glue down.  You now have a basic bodice. (If you are sensitive to the feel of the glue like my daughter, a small bit of cloth tape from the first aid aisle taped over the inside makes the fabric feel completely smooth.)
  5. Now plan out the geometric pattern you plan to have on your bodice and cut out pieces of the felt accordingly.  (I needed some black so I used the left over material from one of the sleeves.   Be sure to save the other sleeve and any left over felt for the Tipare.)
  6. Using the hot glue gun, glue your pattern to the front of your bodice.
  7. If your bodice’s neckline is too low, cut the tops and shorten the shoulder straps using the hot glue gun.

IMG_4057