Archive | My Geekiness RSS feed for this section

Our Tardis Bathroom

12 Jul

When we moved last year, the bathroom was hideous with tiles that must have been installed sometime during the 60s.  I was excited to think that I would have a chance to make my ultimate geeky bathroom.  Despite its small size, I wanted the bathroom to scream Doctor Who when you stepped inside.  I exhausted my search for Tardis bathroom items and settled on making them myself.  Before I could started, some odd twist of fate occurred.  ThinkGeek sent out a notice about a new Tardis shower curtain.  Within a matter of weeks, I had my shower curtain, bath mat, toothbrush holder, and soap dispenser.

I supplemented all of this with solid blue items that I picked up at discount stores and even a spare piece of wood that came in my sister’s wine rack box.


Bathroom 1 Bathroom 2 Bathroom 3 Bathroom 4

You can buy these accessories by clicking their pictures below:

The TARDIS Trunk

13 Apr

Tardis Trunk
Trunk Before 1It all started so innocently.  I have always wanted an old-fashioned trunk.   Towards the end of the summer, I passed a garage sale on my way home from work and came across a very beaten up trunk.   They were actually selling the stuffed animals inside of it and you got the trunk for free.  For $5, I bought my trunk and donated the stuffed animals to charity.  The new trunk had seen better days.   Someone had painted the outside bright green and then used green and pink shelf paper to line the inside.Trunk Before 2

I got to work scraping and cleaning the trunk as best I could.  I peeled away all of the shelf paper.  Using sandpaper, a paint scraper, and buffer, I cleaned, peeled, smoothed and scraped away the inside until it was clean enough to look slightly presentable.  While cleaning a plan had formulated.  I was going to turn this trunk into a TARDIS.
Trunk Before 3 Trunk Before 4

To start changing this trunk into the TARDIS I needed some materials from both a hardware store and the craft store.

The Trunk Base

Supplies:

  • Several cans of Blue spray paint
  • 1 large plastic tarp
  • Several rolls of Blue duct tape
  1. In a well ventilated area, place your plastic tarp on the ground and slide the trunk on top.
  2. Spray the entire outside of the trunk Blue.  (This may take several coats and turns.)
  3. Cover the entire inside of the trunk with the Blue Duct Tape. (I did try painting it at first but it didn’t work so well on this texture.  I also tried contact paper which would not stick to the wood.)

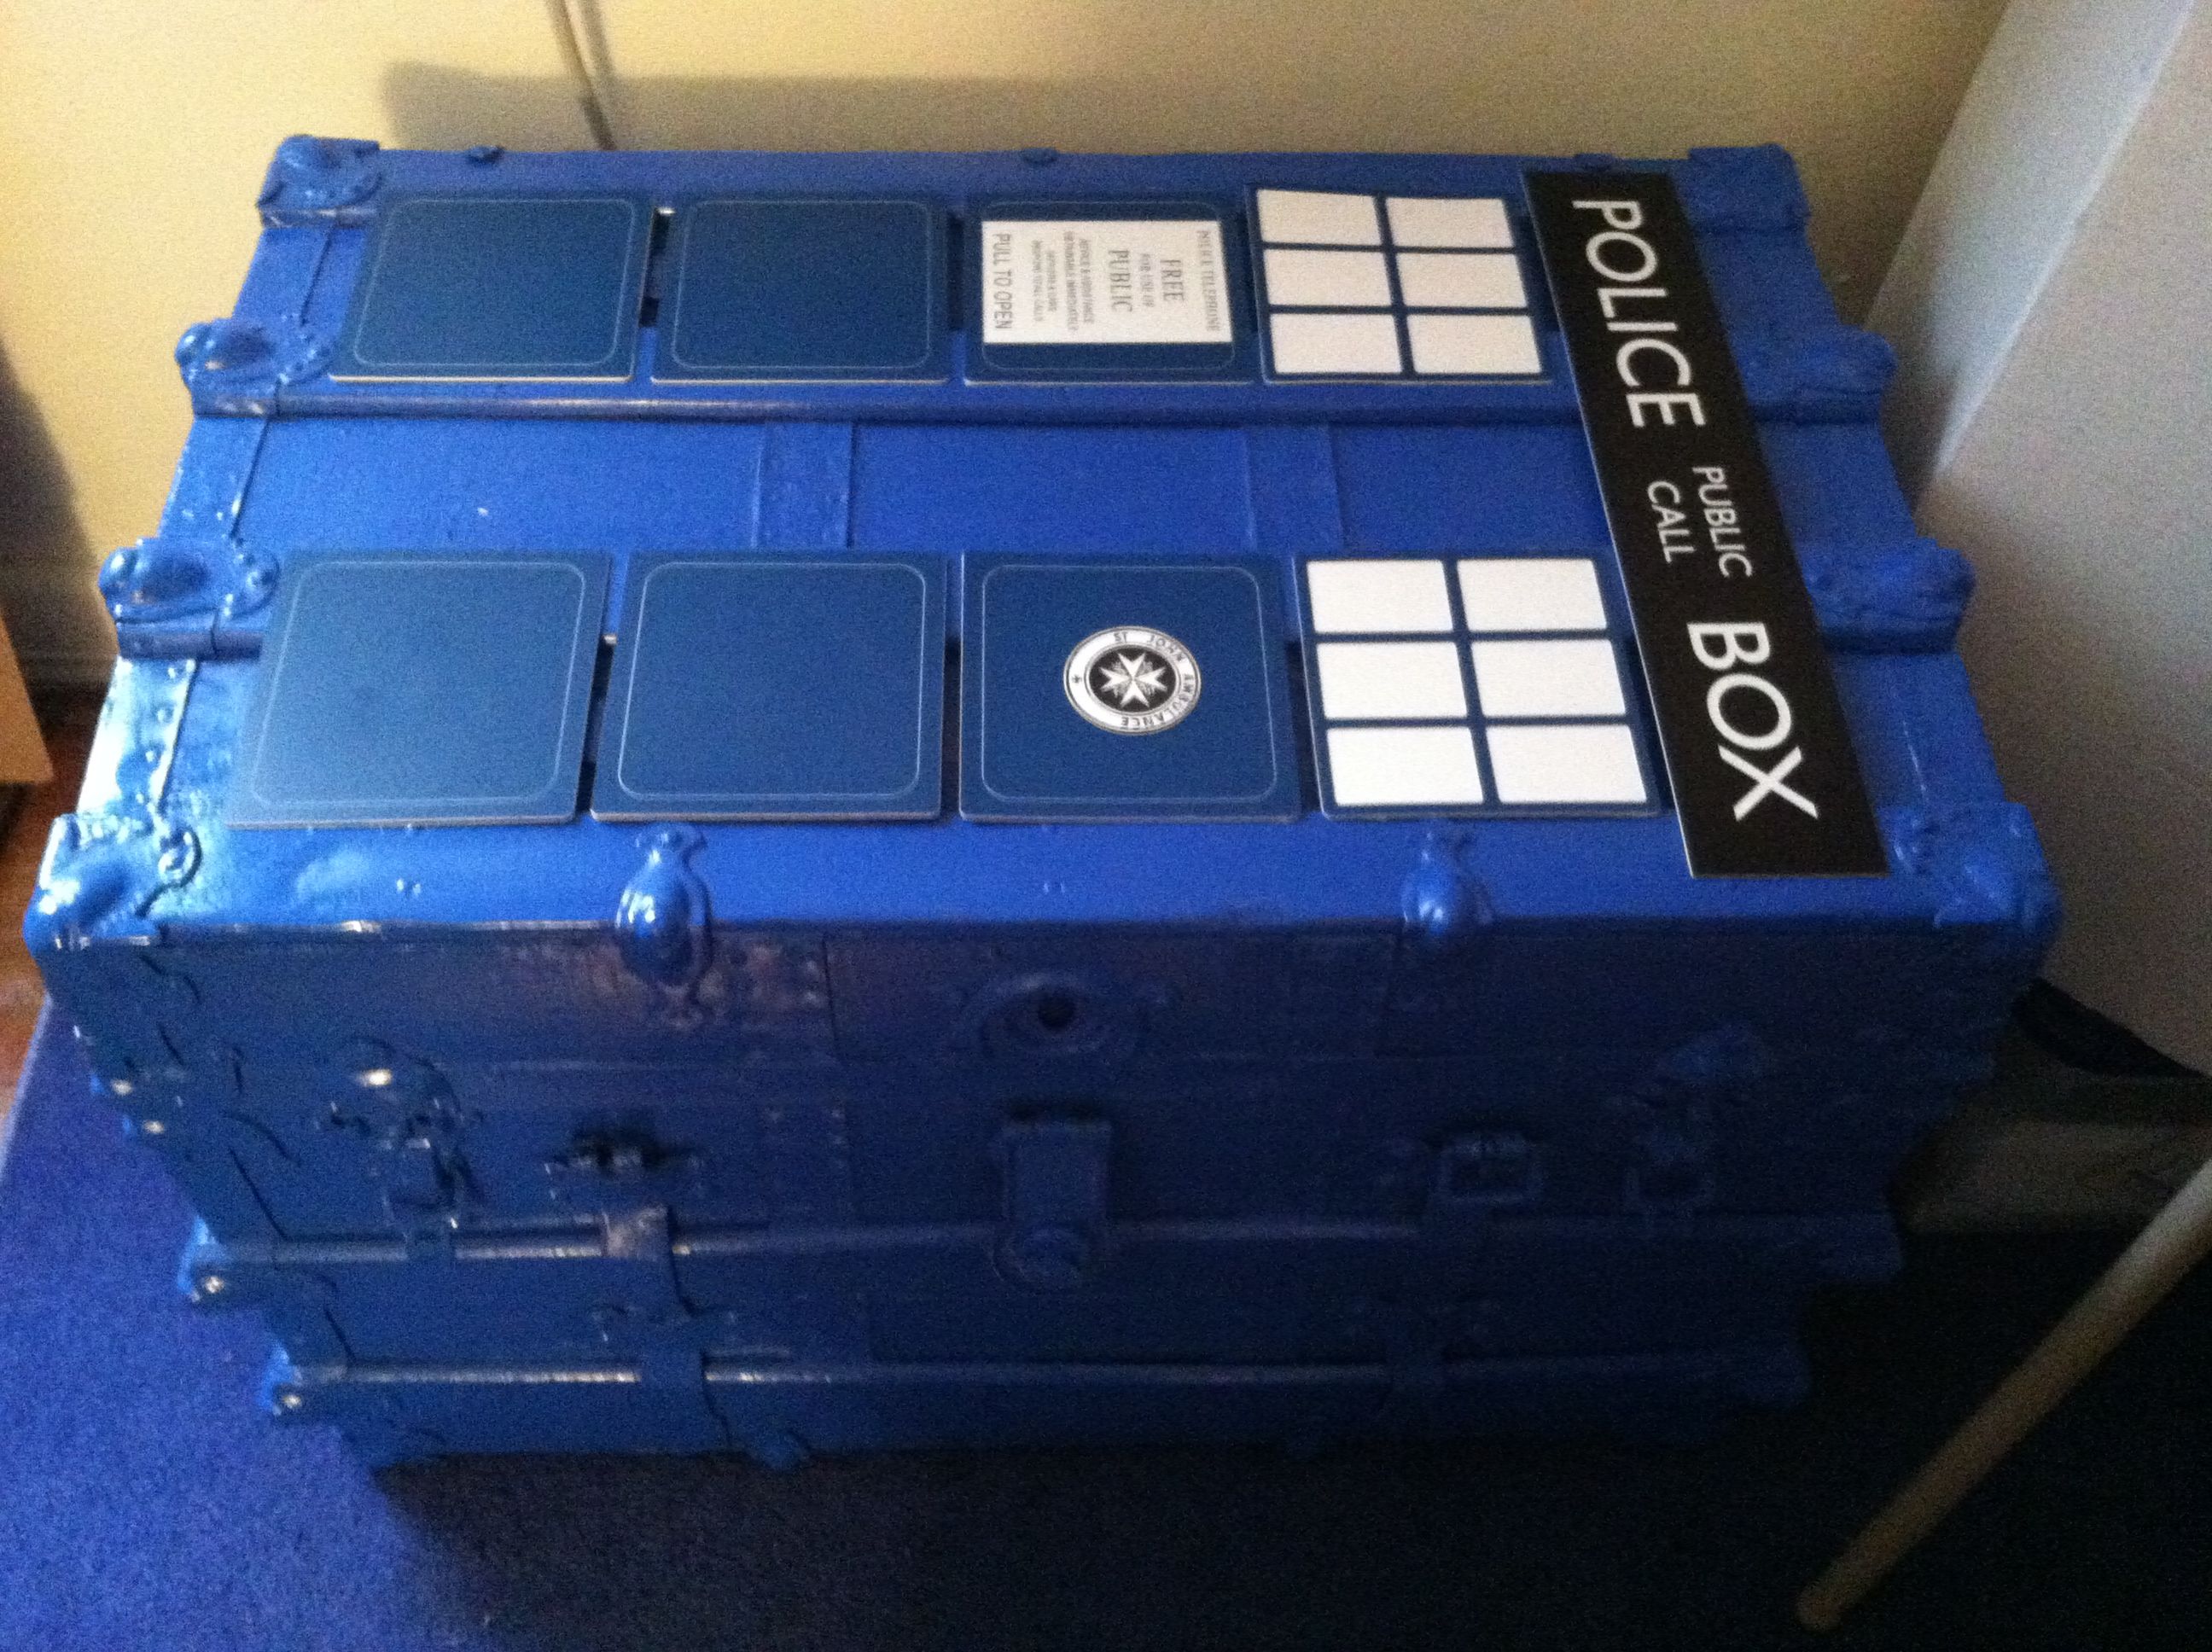
Now that we have a base, the hard part starts.  I was going to paint each bit but then I got a better idea.

At work,  I used Rowmark LaserMark Blue/White to laser cut out the door panels.  The windows and door signs are designed by me and laser cut from Rowmark Flexicolor White/Black with 3M backing.  The Police Box sign was also designed by me and laser cut from Rowmark Flexicolor Black/White with 3M backing.   Once I put it all together, it looked FANTASTIC.

Tardis Trunk Top

Tardis Trunk Inside

I tried to think about what inspirred the idea of making the trunk into the TARDIS and I think it was a Neatorama article about a TARDIS Bookshelf.  I remember thinking how cool it would be to turn my own furniture into Doctor Who-themed items.


2nd Grader Finds Gallifrey

23 Feb

The schools are drilling the kids hard with the Common Core(aka Common Crud). One of the many things that are drilled into the 2nd graders this year is restating the question in their answer. They do drills on this often. My kid saved this one to show me. I was so proud when I read their answers. I love my little Whovian.

Restating Gallifrey

For those who need a little help with 2nd grade handwriting:

3.  If you could travel to space, who would you take with you and what would you find there?
If I could travel though space and take a friend I would take Karen and what I would find there is Gallafrey. (Not a bad attempt for an 8 year old on spelling Gallifrey)

4.  What did you dress up as for Halloween?  Describe your costume.
I dressed up for Halloween as Sailor Moon and Sailor Moon has long, long hair and a blue, small skirt.

Happy 50th Birthday, Doctor Who!

23 Nov

50TH CAKEy50th picChalk Big

In honor of the big day, I am reposting how to make Dalek cake toppers.  Who doesn’t want an edible Dalek?

IMG_0258 IMG_0256 IMG_0257

Dalek Cake Topper

Ingredients:

  • 6 flat bottomed ice-cream cones
  • 1 Wilton White Rolled Fondant 1.5lb
  • 1 Black Wilton Icing Color 1oz
  • 1 Brown Wilton Icing Color 1oz
  • 1 Golden Yellow Wilton Icing Color 1oz
  • 1 Black Pearlized Sugar Pearl Sprinkles 5oz
  • 10 pieces of black taffy (sold by the piece – 15 for $1 at Party City)
  • 4 pieces of white taffy (sold by the piece – 15 for $1 at Party City)
  • 1 pieces of blue taffy (sold by the piece – 15 for $1 at Party City)
  • 1 small package of thin pretzel sticks
  • 1 small package of powdered sugar (This is used to keep the fondant from sticking to table, rolling pin and pretty much anything.)

Directions:

It is a good idea to wear gloves on your hands for steps 2 – 9 to prevent turning your hands blackish brown.

  1. Stack 2 flat bottomed ice-cream cones into each other and turn upside down on a plate.
  2. Separate the fondant into 1 lb and 1/2 lb balls.
  3. Add black icing color to 1/2 lb ball of fondant and knead to desired grey color. (Note: You need powdered sugar to keep fondant from sticking.)
  4. Add brown icing color and just a touch of golden yellow icing color to the 1 lb ball of fondant and knead to desired golden color. (Note: You need powdered sugar to keep fondant from sticking.)
  5. Make 3 balls of golden fondant the diameter of a quarter and place to the side.
  6. Separate golden fondant into 3 even balls and then roll out the golden fondant with a rolling pin. (Note: You need powdered sugar to keep fondant from sticking.)
  7. Place the golden fondant ball in top of the bottom of each ice cream cone and then carefully cover the whole thing with the golden fondant. you can tuck extra fondant under and into the cone to secure it. (Note: Have a small cup of water handy to use to seal the ends by rubbing it with water.)
  8. Roll out the grey fondant ball with a rolling pin. (Note: You need powdered sugar to keep fondant from sticking.)
  9. Cut 3 – 1/2 inch strips of grey fondant. Wet the golden fondant on fattest part of the cone and wrap the grey fondant strip around it to form the Dalek base.
  10. Pour the black pearl sprinkles into a bowl. (Good time to remove gloves.)
  11. Do these next steps one cone at a time: Using your fingers, moisten the bottom of your Dalek just above the grey base to the dent where the cone tapers in.
  12. Carefully place the pearls onto the cone in 4 rows creating columns of “Dalek bumps” on your Dalek.
  13. Unwrap 2 pieces of white taffy and knead them until they are soft.
  14. Roll the taffy and cut into 6 pieces. Roll each piece into a ball and then form the lights on the top of the Dalek’s head. Moisten the area you wish to place the lights and the bottom of the lights. Press into place.
  15. Do the stripes one at a time. For each, unwrap 2 piece of black taffy and knead until soft.
  16. Roll the taffy into a thin string and cut it into 3rds. Wrap each piece around the base of your Dalek’s head.
  17. Unwrap a black piece and a white piece of taffy. You will need to pull them together over and over to create a grey piece of taffy.
  18. Break 3 pretzel sticks in half. Wrap one end of each with the grey taffy and shape into a eggbeater. Stick the other end, downward into the left side of the Dalek above the “Dalek bumps”. (The Dalek’s left but your right.)
  19. Unwrap the remaining black taffy and knead until soft. Mold the taffy to make 6 suction cups, 3 slight larger than the other 3.
  20. Stick a pretzel stick into the back of each suction cup and mold the taffy onto the pretzel.
  21. The larger suction cups are inserted on the opposite side from the grey beater shaped pretzels. These make up the Dalek arms.
  22. Unwrap and knead the blue piece of taffy. Form 3 small balls and place them instead the 3 remaining suction cups to be lights.
  23. Unwrap the knead the last piece of white taffy. Roll very thin, almost string like, and wrap around the middle of each suction cup pretzel remaining.
  24. Insert the last suction cup pretzels into the Dalek’s head, dead center.

stackedconesfondantcoveredconedalekbaseDalekbumpsheadlightdalekstripesDalektrio


Here is to 50 more years!!!!

Chalk Sky

The Weeping Angel Halloween Decoration

24 Oct

WeepingAngel1Who has the scariest door in the entire town?   We do and it only cost $1 to make.

You will need:WeepingAngel2

  • 1 Black Foam Sign ($1 at the Dollar Tree)
  • 1 Silver SharpieWeepingAngel3
  1. Write the words “Don’t Blink!” on the back of your Foam Sign with the Silver Sharpie.  Write the letters in a scary looking font.
  2. You can download and save this one or you can do a Google search for Weeping Angel Face.WeepingAngelMask
  3. Select your the scariest.  Print out either mine or the one you selected.
  4. Color the eyes in with the Silver Sharpie for a creepier effect.  Cut out your Weeping Angel Face.
  5. Hang both on your door to scare the neighbors.

Bonus:  You can also print mine or the one you selected out.  Glue it to cardboard.  Cut the shape and the eyes out.  Now you have a Weeping Angel Mask.  Eek!

“Don’t blink. Don’t even blink. Blink and you’re dead. Don’t turn your back. Don’t look away. And don’t blink.”
-The 10th Doctor, Blink(3:10)

WeepingAngel4

Related Weeping Angel scariness:
1. Weeping Angel Cookies (Discovered at:  Topless Robot)
2.  Weeping Angel Mask (Discovered at:  The Mary Sue via Fasionably Geek)
3.  Weeping Angel Family Car Stickers
4. Don’t Blink Flip Up Tradtional T-Shirt or Don’t Blink Flip UpWomen’s Tee

NY Post Accidentally Confirms the Existence of The Doctor

4 Jun

While waiting for the school bus to come this morning, I was reading my father’s copy of the NY Post when I came across startling proof of the existence of The Doctor. There hidden in a small editorial by Andrea Peyser were facts from a 2013 report about HPV disease. Wow! The Doctor is real. My kids swear they heard the Tardis.

NY Post accidentally confirms the existence of The Doctor.

Some words were removed from the image so that my children could look at it.

Meanwhile, I am working on a document area to share all the documents I have created to make my son’s Boy Scout achievements, belt loops, and pins easier to understand and complete. I want to share the resources with everyone so that is coming soon.